Food for the Poor
It is the world’s most consumed fast food, and each year, Billions of Pizzapies are being devoured worldwide. There are lots of different types and styles around the world, but for sure nobody will doubt that the best original Pizza comes from Italy.
The idea of simply adding other ingredients to bread to make it tastier is not new. Flatbreads with different toppings made part of the diet in a variety of ancient cultures already centuries ago.
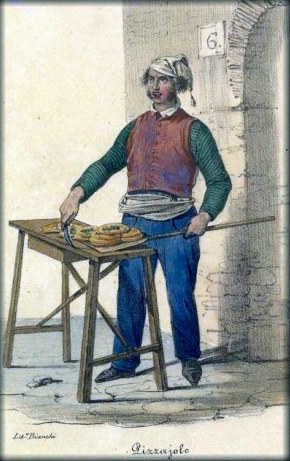
The dish, which seems like the idea of a genius had a very humble and simple beginning. A pizzalike Flatbread very probably started to be sold in Naples in the 16th century and was considered food for the poor working class. Mostly sold by street vendors, made with local and cheap ingredients which otherwise would maybe go to waste.
When in 1889 King Umberto and Queen Margherita visited Naples, they asked for a variety of Pizzas from the famous local Restaurant Pizzeria di Pietro e basta così (“Pietro’s Pizzeria and that’s enough”). The owner Raffaele Esposito was considered one of the finest prime pizzaiolos of his time. The one that pleased the Queen the most was a simple Pizza with tomato, mozzarella, and basil.
This Pizza already existed before, but the Queen was so pleased that she sent a recommendation letter to the Chef of the restaurant. Raffaele Esposito cleverly used this letter of recommendation, to promote his business and named the Pizza after the Queen “Margherita”. It is reported that he fastly gained popularity and some people suggest, that he was the father of the modern style Pizza. The same restaurant in the heart of Naples still exists but is today called Pizzaria Brandi.
When the first Italian immigrants came to the USA by the end of the 19th century, they also brought their food culture with them. Italian Food soon conquered the palate of the Americans, and Pizzerias opened up all across the country. Especially after World War II, the Italian Food Culture had a boom. As the Italian Food Culture spread in the USA it was adapted to local taste and identities. This was the creation of American-style Pizza Pies with its different influences. Nowadays big companies, selling American-style Pizza exist all over the world.
What is a Neapolitan Style Pizza
If you have ever visited Italy, you may have noticed, that there exist different styles of Pizzas, depending on the region. For example, the Pizza Romana, from the capital, with a very thin almost cracker-like crust. Or Pizza al Taglio, literally meaning “Pizza by the cut”, baked in sheet pans and then sold by the slice.
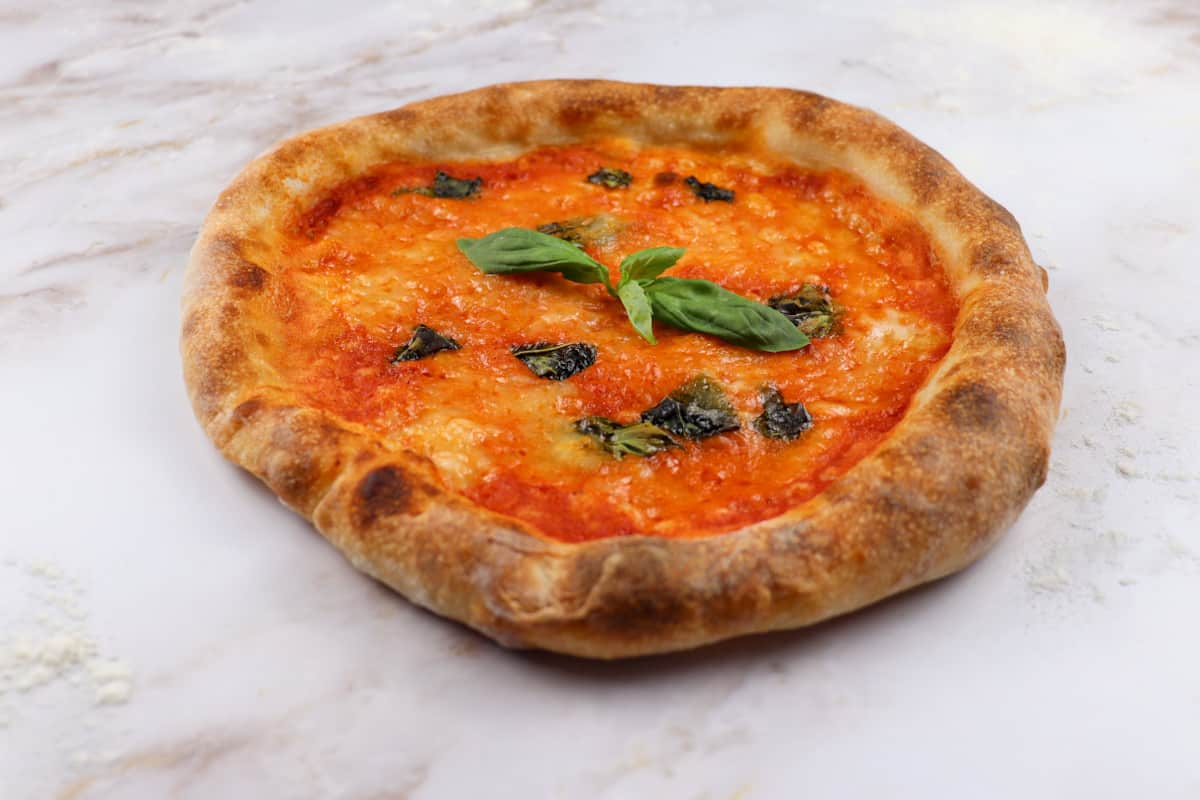
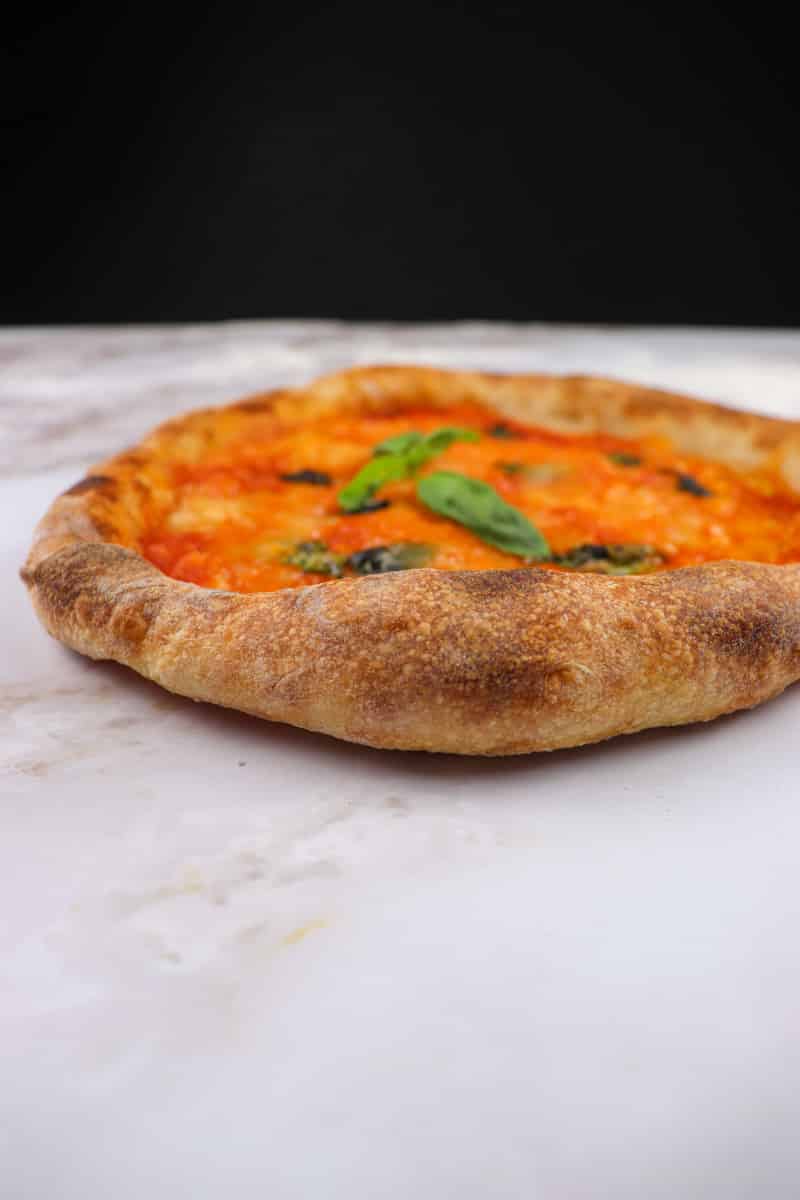
Maybe the most famous of all is the “Pizza Napoletana” – the one we will try to replicate in this recipe. I say replicate because for an original Neapolitan style Pizza you need a blisteringly hot wood-burning oven. Protected by a Traditional Specialty Guaranteed (TSG) certification, this style must be made in a very particular way. In 2017, the art of making Pizza Napoletana was added to UNESCO’s list of intangible cultural heritage.
The perfect original Pizza Napoletana has a soft, elastic heart with a tall, airy crust called the cornicione in Italian.
If you like Italian Cuisine, you should try my recipe for Spaghetti Carbonara
Which Flour to use for Pizza?
With a great variety of different types of flour on the market, it can be sometimes confusing to know which type to use. A lot of recipes simply call for Pizza flour – but what is that exactly? And more importantly, is it essential?
With Pizza flour, people normally refer to double zero flour or 00 flour. Every country around the world has different systems to grade their flour. In Italy, wheat flour is graded with numbers (00,0,1,2). This grading reflects how finely the flour is ground, the smaller the number the finer, meaning 00 the finest. It is achieved by only using the whitest, inner part of the wheat and then passing it through the mill many times. The number does not reflect the protein content.
To make Neapolitan Style Pizza, like in this recipe it is important to develop a lot of gluten.
Gluten is a combination of two proteins in flour: glutenin and gliadin. When flour comes in contact with water, gluten is formed like a web of these proteins. The water allows the gluten to stretch while kneading, and folding increases the ability of the proteins to organize in a way to capture the gases produced during the fermentation process. You can imagine the gluten web in your dough like a balloon that holds the gases inside it. The stronger the gluten development is in your dough, the more you can pump up the balloon before it explodes and your dough deflates.
The more protein content a flour has, the more gluten development is possible. Normally, the more sun the wheat is getting during the growing process, reflects in the protein it can develop. That’s why Italian flours mostly have a high protein content independent of the milling grade (00,0,1,2), while for example even fine milled 405 flour from Germany have much less protein content.
So to make a Neapolitan Style Pizza in your home oven, you can also you a high protein content bread flour. Make sure to get flour that has a minimum protein content of 11g.
The more protein content you have present in wheat flour, the higher you can make the hydration of the dough. In general, the hydration of Pizza dough is quite low, compared to other recipes like in bread baking.
For this recipe, we use a hydration from 60%-65%. This is baker’s math and means that we use 60%-65% of the water from the total weight of the flour used.
If the flour you are using has less than 11g of protein, use a 55% hydration.
From 11g-12g of protein in your flour, use a 60% hydration.
From 12g-14g of protein in your flour, use 62% to 64% hydration.
If the flour you are using has more than 14g of protein content, use 65% hydration.

Fresh Yeast vs Dry Yeast
If you use fresh yeast or dry yeast, this is totally up to you, just know the differences.
Fresh yeast is moist and soft, mostly sold in cubes, and must be refrigerated. You can theoretically freeze fresh yeast, but a part of the microorganisms will be eliminated, and after a while in the freezer, it will perish completely.
Dry yeast is fresh yeast that has been pressed and dried until the moisture content makes the yeast dormant. Dry yeast has a much longer shelf life than fresh yeast and does not need to be refrigerated unless opened. Once opened, dry yeast also needs to be stored in the refrigerator away from moisture, heat, and light because it deteriorates rapidly when exposed to air.
Both are species called Saccharomyces cerevisiae, single-celled microorganisms classified as members of the fungus family. The yeast microorganisms convert carbon hydrates to carbon dioxide and ethanol through the process of fermentation.
There is a big difference in the quantity to use between fresh and dry yeast, as dry yeast is essentially more concentrated.
The ratio between dry and fresh yeast is 1:3. Meaning if you change dry yeast for fresh yeast in a recipe you have to use 3 times as much.
In this recipe, we are going to use a percentage of the total amount of flour (baker’s math again). If you use dry yeast, you need 0,05% of the total amount of flour used. If you use fresh yeast, you need 0,15% of the total amount of flour used. So three times as much fresh yeast then dry yeast.
It is essential to understand that yeast reacts differently with temperature. Meaning, the warmer the ambient temperature, the quicker yeast will develop its abilities. On the contrary, the colder the ambient temperature, the slower the fermentation process.
So if you are making this recipe in wintertime, and your ambient temperature is beneath 20ºC (68ºF), double the amount of yeast.


Which Cheese to use for Pizza?
What kind of topping you want to use on your Pizza is completely up to you, and everybody has his preferences. But most likely you will want to use some kind of cheese.
The most used cheese types for Pizza, are mozzarella, parmesan, provolone, pecorino, gorgonzola, and chevre. The most used for traditional Italian Pizza for sure is mozzarella. You can either use dry shredded mozzarella or fresh one.
I personally like fresh mozzarella more than the shredded dry one, mainly because of its better taste and quality. But when you are going to use fresh mozzarella, you can´t just take it out of the package and put it directly onto the Pizza pie. Because of the moisture, the cheese would get the Pizza all wet and soggy, resulting in a watery pizza or even tearing the thin crust apart while taking it out of the oven.
When using fresh mozzarella it is very important to cut the cheese in advance and let some of the liquid leak out. Cut the mozzarella in cubes (more or less 0,5cm x 0,5cm), and place it inside a sieve over a bowl. Let some of the liquid leak out for at least an hour or overnight the day before you plan to make Pizza.
The Perfect Tomato Sauce for Italian Pizza
Pizza is made just out of a few simple ingredients, which is why besides knowing the proper technique, the high quality of the products is essential. One of the most influential parts of the topping, for sure, is the tomato sauce.
To make a tasty tomato sauce, you need flavorful tomatoes. That seems perfectly obvious, but the right choice is not always that simple. The best tomatoes for sauce are the ripest you can find.
To have access to ripe and tasty fresh tomatoes can be very difficult or impossible. That’s why mostly it is a much better choice to use canned tomatoes. Canned tomatoes are much riper and receive more sunlight than tomatoes which are sold in the market for consumers. The farmers leave them on the plant longer time to develop more flavor and because they don’t need to be transported or last longer in the market.
If you are not sure which canned tomatoes you should buy, you can´t go wrong with San Marzano tomatoes from Italy. The San Marzano tomato is a type of plum tomato, with fewer seeds a balanced flavor that combines sweetness, intensity, and just the right amount of acid.

Already know what you are going to serve for Dessert? How about an easy Creme Brulee?
The Necessary Equipment for a Perfect Pizza
Naturally, you need an oven to make your homemade Italian Style Pizza. But, there are a lot of opinions, on how to bake your Pizza Pie in an oven at home. Do you need a Stone or a Steel to make a perfect Pizza? Well, in my opinion, not at all!
In this recipe, we just use a metal baking sheet to bake the Pizza. The baking sheet creates enough heat to obtain an amazing crust. Also, does it distribute the heat evenly during the baking process.
It is important, that the oven gets heated to the max with the tray inside the whole time. I turn the baking sheet upside down to create a more even surface. There is no parchment paper necessary, as it only impedes the wanted browning of the dough.
The only thing I actually recommend buying is a Pizza paddle. Because you leave the metal baking sheet inside the oven, handling the Pie without a Pizza paddle is difficult. If you really do not want to spend money on a Pizza peel you can also use a big piece of carton, which works just fine for single use.

The right Quantities of Ingredients for Pizza
First of all, I want to stretch out, how important a kitchen scale is for baking. If you want to get consistent results, you will find it especially beneficial to use measurements by weight, not volume.
Especially when working with flour, 2 cups of my flour will not be the same amount as 2 cups of your flour. Depending on the milling grade and the way you put the flour inside the cup, yours might be packed tighter or looser than mine. A few tablespoons of water may seem hardly noticeable visually, the weight will be significantly different. So if you don’t have a kitchen scale, I really encourage you to invest in one.
Another thing that can improve your baking skills and make your life easier is to know the percentages of the ingredients. This system is called baker’s percentages or baker’s math. With baker’s percentages, all ingredients in a recipe are stated as percentages of the total flour weight. The total amount of flour is always 100%.
So if in a recipe the flour is 1000gr and the hydration is 60%, you have to use 600gr of water. And 20gr of salt in this recipe would mean 2% of the flour weight. This allows recipes to be scaled up or down easily and rapidly.
In the table below, you can see the baker’s percentages for pizza dough.
| Ingredients | Bakers Percentage |
|---|---|
| Flour | 100% |
| Water | 60%-65% |
| Salt | 2% |
| Yeast | Fresh 0,15% / Dry 0,05% |
When the ambient temperature is beneath 20ºC (68ºF), double the amount of yeast.
Also, once again, the percentage of hydration of the dough in connection to the protein percentage in your flour.
| Protein Content in Flour | Hydration |
|---|---|
| < 11g of Protein | 55% Hydration |
| 11g – 12g of Protein | 60% Hydration |
| 12g – 14g of Protein | 62% – 64% Hydration |
| 14g < of Protein | 65% Hydration |
The same principles of Bakers Math apply for Bread baking. Try it out!!

The Italian Pizza Recipe
Homemade Italian Pizza
Equipment
- 1 oven
- 1 kitchen scale
- 1 Pizza Paddle
- 1 dough scraper
- 1 fine sieve (for the sauce)
Ingredients
- 500 g Flour
- 300 g water (60%) filtered 2q1
- 10 g salt (2%)
- 0,75 g fresh yeast (0,15%) or dry yeast 0,25g (0,05%)
- 1 can tomatoes
- 250 g fresh mozzarella
- som leaves fresh basil
- dash olive oil
- some fresh ground black pepper
Instructions
For the Pizza dough
- Because of a long fermentation of the Pizza dough, plan to start the dough more or less one day before you are going to bake the Pizzas.
- The quantities for the Pizza Dough in this recipe are relative to the baker's percentages explained above. With baker's percentages, all ingredients in a recipe are stated as percentages of the total flour weight. The total amount of flour is always 100%. (Flour 100%, Water 60%-65%, Salt 2%, Fresh Yeast 0,15% or Dry Yeast 0,05%). For 500g of flour 0,25g (0,05%) of dry yeast is needed. This is more or less a quarter of a teaspoon. You can see the quantity in the photo on the side.When the ambient temperature is beneath 20ºC (68ºF), double the amount of yeast.

- As explained in the article above, the percentage of hydration depends on the flour you are using. The more protein your flour contains, the more water you can add.If the flour you are using has less than 11g of protein, use a 55% hydration. From 11g-12g of protein in your flour, use a 60% hydration. From 12g-14g of protein in your flour, use 62% to 64% hydration. If the flour you are using has more than 14g of protein content, use 65% hydration.
- In a big bowl or pot, mix together all the ingredients are incorporated. Let the dough sit for 15 minutes.
- After 15 minutes of resting, knead the dough on the bench by folding it over itself for about 5 minutes.
- After that, shape the dough by turning it 45 degrees and pushing it towards you until it forms a nice firm ball.
- Put some olive oil in the bowl so the dough doesn't stick. Place the dough ball back into the bowl, spread a little bit of olive oil on top of the dough, and cover with a lid or plastic film. Let the dough ferment and rise at ambient temperature until it doubles in size. This can take about 8 to 12 hours depending, on the ambient temperature. You can leave the dough during the night if you want.
- Make 1-2 Folds during this first fermentation period. The easiest and best way is to perform coil folds. For this, wet your hands a little bit, which prevents the dough from sticking to you. Next, scrape your fingers around the edge of the dough to gently separate it from the container. Put your hands from both sides under the middle of your dough and lift it up, so the dough forms a bridge. Now fold one side from the bridge under the dough, then the other, and rest the dough on top of the folds again. Turn the dough for 90º and repeat the same.
- When the dough has doubled its size, perform one more coil fold, cover the dough again, and put it into the fridge. This will slow down the fermentation and bring more flavor to the dough. Leave the dough in the fridge for at least 4 hours, or until 2 hours before you want to bake your pizza.
For the mozzarella cheese
- If you are using fresh mozzarella, it is essential to drain the liquid. The day before or at least one hour before you are going to make the pizza, cut mozzarella cheese into cubes (0,5cm x 0,5cm). Place the cubes in a sieve, and let the cheese drain over a bowl.
For the Tomato Sauce
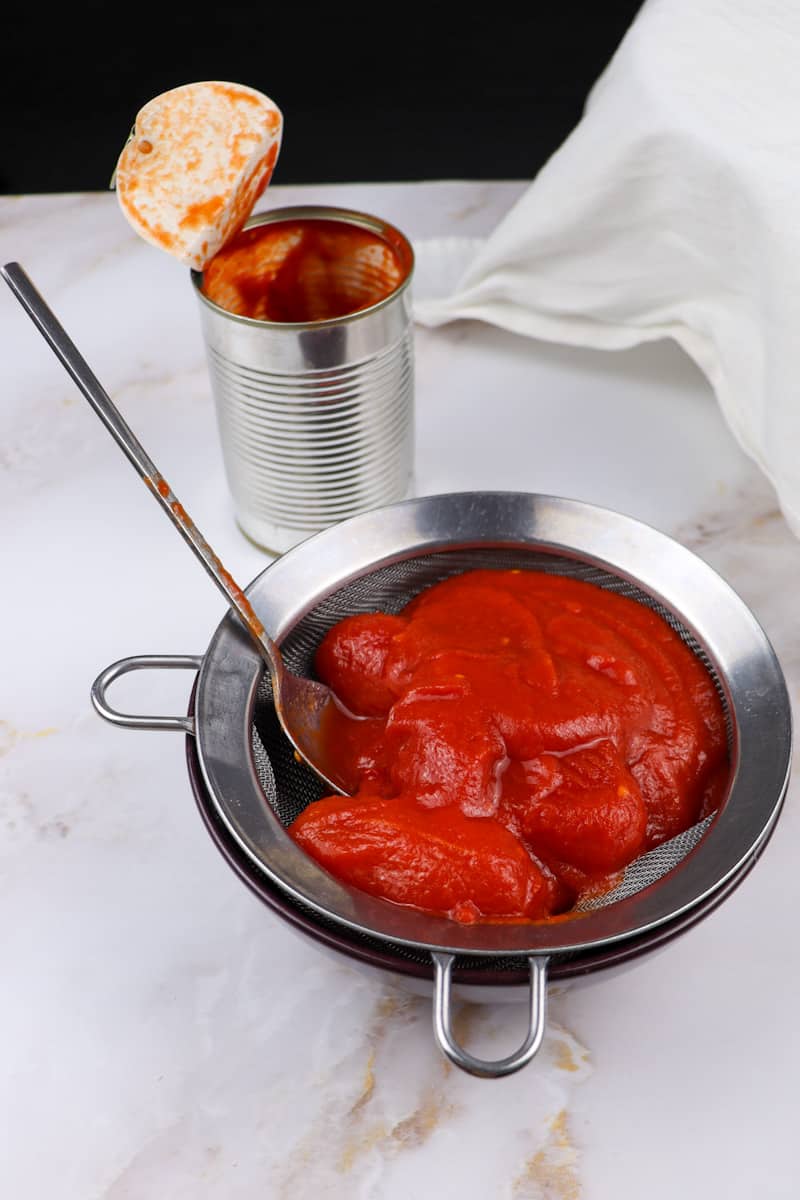
- Place a fine sieve over a bowl and pour the tomatoes from the can inside. With the help of a spoon, press everything through the sieve to remove the seeds and the skins. Season the remaining tomato sauce with a dash of olive oil, salt, and fresh ground black pepper to your liking.
To Shape the Pizza Dough Balls
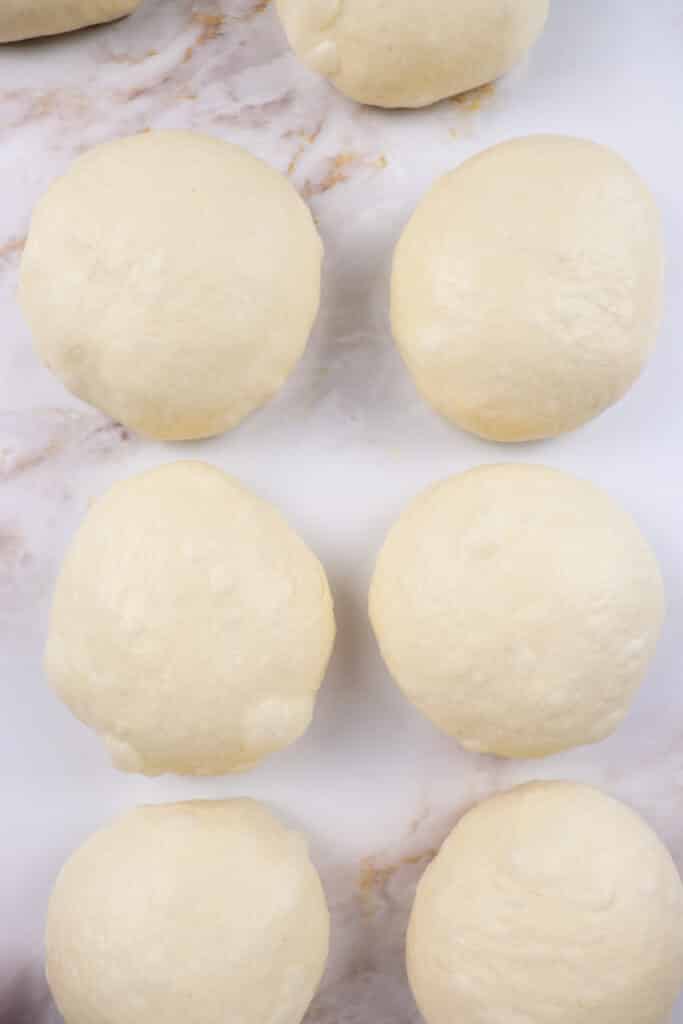
- Take out the dough approximately 2 hours before you are planning to bake the pizza. With the help of a dough scraper, and a kitchen scale divide, the dough in parts of 180g-250g.
- Now slightly pre-shape the dough chunks without degassing the dough. There is no flour on the surface needed at this point. Place your shallow hand over each chunk of dough, and gently drag over the bench surface. While you gently drag the dough rotate it until forming a loose ball. Leave to rest for 10 minutes.
- After 10 minutes, you can make the final shaping of the dough balls one by one. For this process, place a dough ball upside down. Now take an edge of the ball and pull from the outside to the middle. Press down that edge in the middle, rotate the ball, and repeat. Continue to do that until you come to the beginning again and have formed a nice and tight package. Flip the package, so the folds are on the bottom, and with a shallow hand drag the ball again like in the pre-shaping process.
- Dust the shaped balls lightly with flour, and cover them with a damp kitchen towel or plastic film (if you want, you can also place a small bowl over each dough ball to cover). Now let them rest at ambient temperature again until they double in size (30min – 1 hour).
To make the Pizza
- Turn on your oven to the maximum temperature at least half an hour before baking the pizzas. Leave the baking sheet inside and place it upside down.
- To form the Pizza Pies, put some flour on the bench, and place one of the dough balls on top. Also, flour the top of the dough ball, and start to press down the middle with your fingers. Work your fingers from the middle in every direction, pushing the air to the sides, until forming a small ring. If your fingers start sticking, sprinkle some more flour.
- When you have a small ring, more or less the size of your hand, you can carefully lift up the pizza on the side, securing it with your fingers just under the rim. Carefully and quickly turn the pizza, letting gravity do the work until the middle part gets thinner and thinner.
- You can also carefully lift the pizza and place it on your knuckles, stretching the dough. The whole process requires a little bit of practice, but after the first few pizzas, it will get easier. If you accidentally tear a hole inside, just stitch the dough together again. Continue stretching the pizza until the pizza is big enough for you. The middle part should be very thin, until you nearly can see through the dough.
- Put a little bit of flour on the pizza paddle and place the pizza on top. It is easier to move the pizza without topping. When you apply the tomato sauce and the other toppings, the pizza should go into the oven as quickly as possible. Otherwise, it will make the dough soggy, and it will be more difficult to load the pizza into the oven.
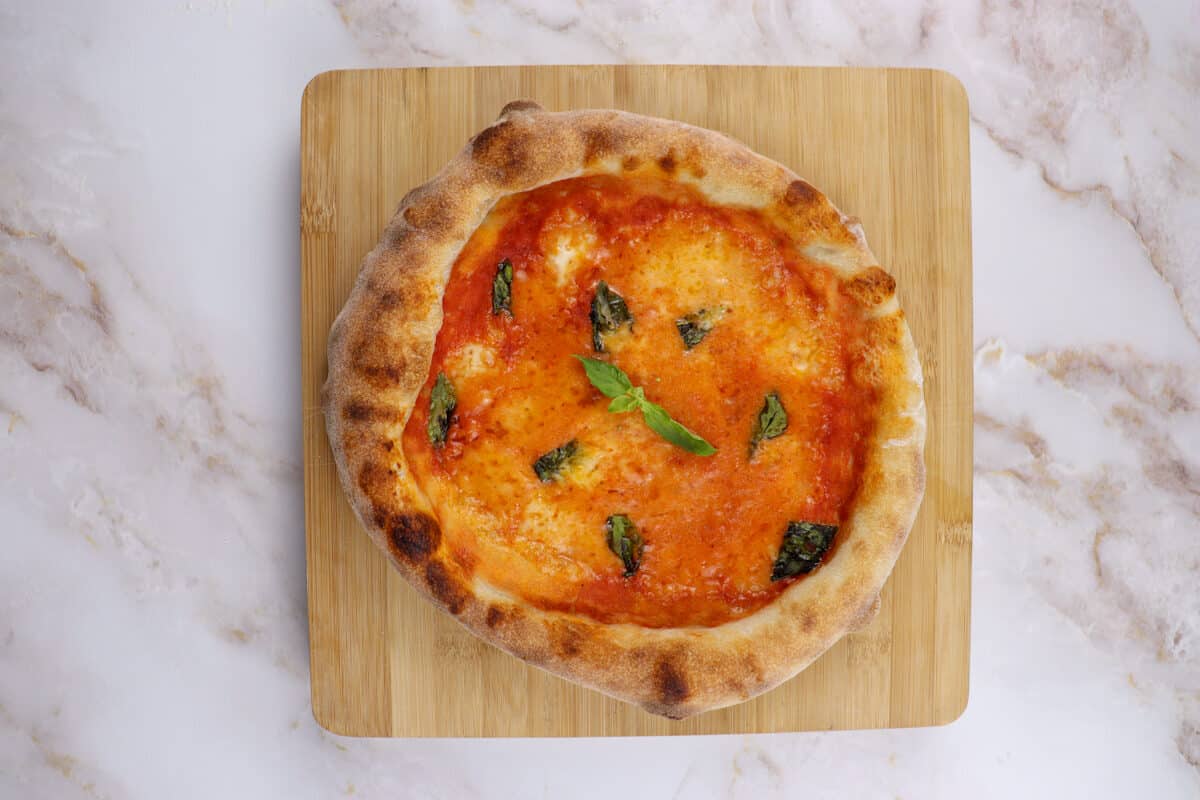
- Spread some spoons of tomato sauce on top and spread with a rotating movement and the back of your spoon. Add some basil leaves on top of the tomato sauce. Sprinkle the cut mozzarella on top, and if you like, season with some ground black pepper and olive oil.
- Now carefully load the pizza inside the oven with your pizza paddle. Close the door of the oven, and bake until the crust is nicely brown and has fully risen. This should take about 5 minutes. Take the pizza out of the oven and decorate with some fresh basil.